We are open Monday to Friday
Product Hotline - 01993 704 981
Local call rate - 0208 0909586
Part E Compliance for Separating Stud Walls
Details on meeting Part E 2003 Resistance to the Passage of Sound for lightweight stud walls.
Stud partitions are often preferred due to their lightweight composition and speed of construction and can often be superior to masonry walls in acoustic efficiency. To meet Part E compliance separating walls must meet the following minimum requirements for noise control.
Change of use of existing wall 43dB or above
New build separating stud wall 45dB or above
All newly constructed walls the subject of a change of use must be tested whenever possible to prove they meet the required levels of sound control, so it is better and cheaper to do the job properly and get it right first time.
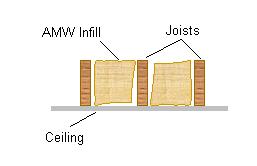
Flanking noise beneath and above separating walls can often lead to a test failure so steps should be taken to address this before construction of the wall commences. If the floors and ceiling are timber joisted then flanking noise can be aproblem that is best addressed with the installation of AMW type acoustic mineral wool loosely fitted between the joists as shown below.
FLOOR AND CEILING JOISTS
Check to see if the joists are parallel to the proposed wall by lifting the floorboards and if they are simply loose fit AMW type acoustic mineral wool between the joists to the top of the joists on either side and under where the new wall will be then screw back the floorboards.
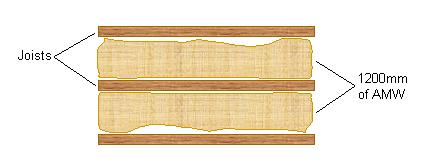
But if the joists are running at right angles to where the new wall is to be sited, install the AMW across where the wall is going to be so that 600mm protrudes from either side of the centre line of the new wall.
CEILINGS
Ceilings should be treated in exactly the same manner and it is usually easier from above unless it is a loft. With lofts it usually better to install the usual fibreglass type loft insulation, then board the loft out with 18mm t&g flooring followed by more loft insulation to comply with current Building Regulations for thermal insulation.
SEPARATING FLOORS AND CEILINGS
When floors and ceilings are separating flats and have to comply with Part E for noise control, they should be uprated after installation of any separating walls which should be constructed directly off the joists or base floor and up to the ceiling joists. Once the separating wall has been installed, work to install floating floors and decoupled, acoustic and fire rated ceilings can be fitted.
More information on acoustic materials used for floors and ceilings can be viewed on this web site via the following links.
R10 resilient floating floor insulation
QuietBoard high density tongue and grooved acoustic flooring
SUPPORTING WALLS
Flanking noise around walls can be a problem and is usually caused by structural walls with a cavity and lightweight blocks. Infilling the cavity with blown mineral wool will help reduce this issue. If an existing wall is of stud construction it should have the cavities loosely filled with acoustic mineral wool or for better results, our SoundBlocker Quilt and 30mm (2 x 15mm) acoustic plasterboard screwed to the frame. Once these issues have been addressed, installation of the separating wall can commence.
UPGRADING EXISTING SEPARATING WALL
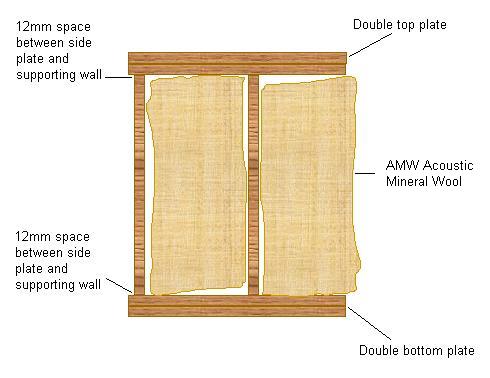
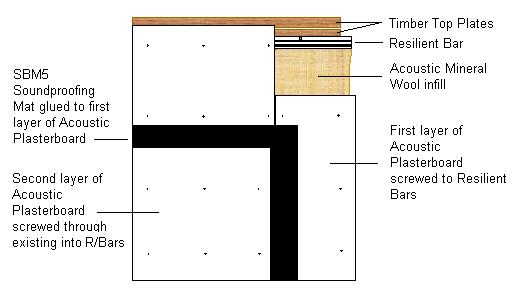
Using 75mm timber or metal stud the frame should be constructed 25mm away from the existing wall on a double thickness 75mm sole and top plate as shown in the drawing below.
Vertical rails should be installed at 600mm centres without noggins and 12mm away from existing side walls. The rest of the soundproofing treatment is as follows.
1. Loosely infill between the stud with 100mm of AMW100 acoustic mineral wool or for a better result, our SoundBlcoker Quilt should be installed and fixed to the sides of the frame with staples or battens.
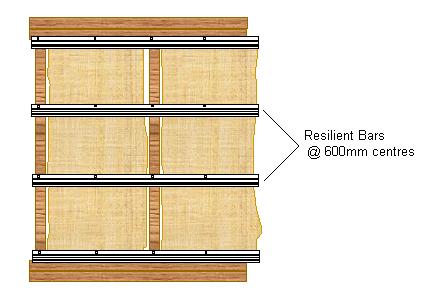
2. For the best result, screw Resilient Bars across the frame at 600mm centres from top to bottom.
3. Screw one layer of 15mm Acoustic Plasterboard to the bars leaving 1-2mm of space where the wall meets the floor, side walls and ceiling.
4. Glue to the wall our 2mm SBM5 sound barrier mat.
5. Screw through the barrier mat and existing plasterboard to the resilient bars behind another layer of 15mm acoustic plasterboard.
6. Seal the edges with Acoustic Sealant then tape and finish the joints and smooth ready for decorating.
CONSTRUCTION OF NEW SEPARATING WALL
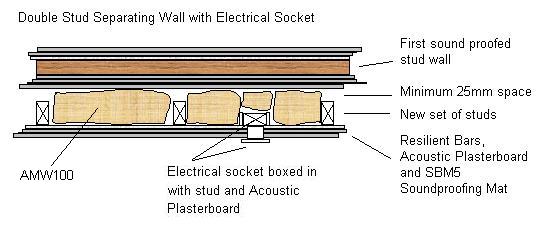
For best results, the separating wall, if it is going to be stud should be of an independent double stud construction where two stud walls are constructed about 25mm away from each other and will take up about 280mm of space. Construction should be as follows.
1. Construct the first frame with 75mm timber or metal stud. Either one of these should have a double sole and top plate as shown above.
2. The vertical rails should be installed at 600mm centres without noggins and the side plates 12mm away from existing walls.
3. Screw to one side a double thickness of 15mm acoustic plasterboard with the top layer overlapping the joints of the first.
4. Loosely infill the cavity within the frame with 75mm of AMW75 acoustic mineral wool or for a better result, our 50mm SoundBlocker Quilt which should be stapled to the inside edges of the frame.
5. Screw a double thickness of 15mm acoustic plasterboard to the frame.
6. Now install another frame 25mm away from the first completed wall and repeat the process described above.
7. Any gaps between the plasterboard and side walls, floor and ceiling can be sealed with acoustic sealant.
8. Tape, fill and smooth all joints before decorating.
Note! Fitting of any electrical sockets and switches should be avoided but if necessary should be fitted into a box constructed using timber stud as shown below and holes for wiring sealed with acoustic sealant.
The information given above if correctly followed will comply with the noise control requirements of Part E through separating walls. The details given exceed the build requirements within Part E because it has been found that in many instances, will fail the required pre-completion testing required before the project can be signed off.
More information on Part E can be found by clicking on the following link.
http://www.planningportal.gov.uk/uploads/br/BR_PDF_ADE_2003.pdf
– See more at: http://www.soundservice.co.uk/separating-stud-walls-to-meet-part-E.htm#sthash.8VagcjEc.dpuf

