We are open Monday to Friday
Product Hotline - 01993 704 981
Local call rate - 0208 0909586
Silver Floor Cavity System Installation Guide
Download this as a PDF file HERE
BE SURE TO READ THESE INSTRUCTIONS THOROUGHLY BEFORE COMMENCING ANY WORK
NOTE. THESE INSTRUCTIONS MUST BE FOLLOWED OTHERWISE INCORRECT INSTALLATION COULD OCCUR WHICH MAY HAVE A DETRIMENTAL EFFECT ON THE PERFORMANCE!
INTRODUCTION
This system is designed to improve the sound insulation of timber suspended floors so is not suitable for concrete floors. It is particularly useful if any increase in the existing floor height is not desired and will help reduce airborne noise from above and below. The system is also a very good prelude to further soundproofing that may be required on top of the floor to enhance the soundproofing properties of the insulated floor.

Step 1.
Remove all existing floor coverings
Step 2.
Carefully remove all skirting boards. It is unlikely these will come off in one piece but can easily be replaced once the floorboards have been relaid. Now take up the floorboards. If these are square edged and you wish to re-use them then take care not to split them when lifting.
Step 3.
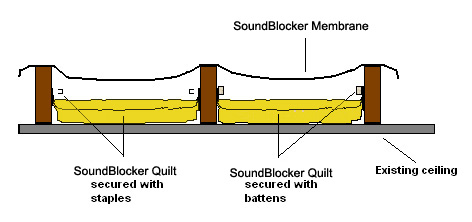
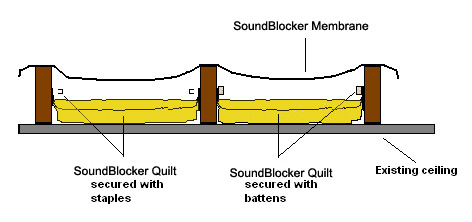
Unroll the SoundBlocker Quilt between the joists and ensure that it laps up the sides of the joists equally on both sides. Then using an upholstery type staple gun and long staples (14mm) staple the quilt to the inside edges of each joist. Enough staples must be used to minimise air leakage past the quilt. Alternatively, timber battens can be used and nailed in to trap the quilt between the batten and joist.
Step 4.
Unroll the SoundBlocker Membrane across the joists. Using felt nails, secure the membrane to a joist on one side of the room then ensure it covers all of the joists wall to wall. Where jointing is required a minimum 50mm overlap will be necessary. It does not matter if it drapes into the void between the joists but strategically placed felt nails may be required to ensure the membrane remains in position and where you want it to be. Help may be required for this part of the installation.
Step 5.
Check to ensure there are no gaps in the joints and if any are found, overlay and seal them up with offcuts of membrane and secure them with felt nails.

Step 6.
Replace the flooring using the original or replacement boards. If replacement boards are being used, ensure they are t&g and screwed down so as not to squeak when walked over. Nails should never be used because they sometimes work loose over time.
Step 7.
If there are any gaps around the edges where the flooring meets the wall, seal with our Acoustic Sealant (optional) then refit the skirting boards.
Step 8.
Install whatever floor covering now required but this is also a good opportunity to install further sound insulation before any floor covering is put down.
NOTES
It may be preferred to use a second fix carpenter to install this insulation although any DIY orientated person can undertake it.
JOB’S DONE!
If you have any difficulty with the installation or require any additional advice, please contact our Technical department on 0845 363 7131
The contractor shall be responsible for the examination and acceptance of all conditions and project suitability prior to the installation.
