We are open Monday to Friday
Product Hotline - 01993 704 981
Local call rate - 0208 0909586
Floating Floor System Installation Guide
Download this as a PDF file HERE
BE SURE TO READ THESE INSTRUCTIONS THOROUGHLY BEFORE COMMENCING ANY WORK
NOTE. THESE INSTRUCTIONS MUST BE FOLLOWED OTHERWISE INCORRECT INSTALLATION COULD OCCUR WHICH MAY HAVE A DETRIMENTAL EFFECT ON THE PERFORMANCE!
NEEd TO MEET THE PART E BUILDING REGS?
If used with our Studio Ceiling System on the ceiling below, the Floating Floor System should pass the Part E Building regulations for house conversion and new builds. If just installed following the information below it may fail.

INTRODUCTION
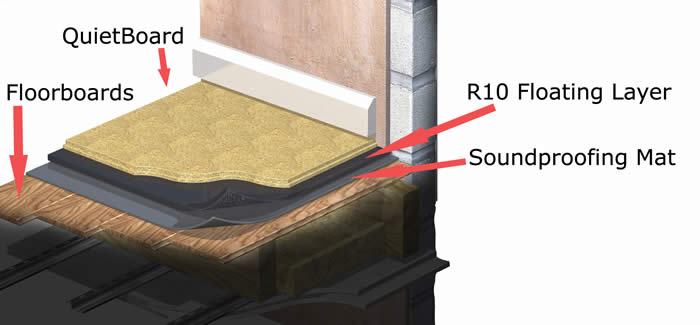
This system is used as part of the overall insulation required to bring separating floors into compliance with current building regulations and is often used to isolate floors in music studios. The high density QuietBoard acoustic flooring acts as a sound control for airborne noise and the R10 resilient insulation beneath absorbs impact noise from footfalls etc.
Before installing this system it is advised that all of the insulation including the QuietBoard are kept inside for at least 24 hours to stabilise.
Step 1.
Remove all existing floor coverings
Step 2.
It may be preferred to remove all skirting boards within the room to be treated. If this is the case it is unlikely they will come off in one piece but can easily be replaced with new boards that are usually readily available locally.
Step 3.
Check to see if the floorboards are tongued and grooved by inserting a thin bladed knife between the joints. If the knife goes all the way through the floorboard joints will be square edged and should be sealed with our Acoustic Sealant (may require extra) before commencing with the rest of these instructions. If the skirting boards have been removed also seal where the floor meets the walls.
If the floor to be insulated is concrete then ignore the instruction above.
Step 4.
Using our special aerosol contact adhesive, bond the first layer of 2mm SBM5 soundproofing mat to the floor. The adhesive has an adjustable nozzle so it is usually better to select the widest spray pattern by turning the nozzle so it aligns with the symbol and usually marked H at one o’clock to the nozzle. The other settings are M and L for medium and low spray pattern. (See application instructions on side of can). Spray the soundproofing mat and then spray an appropriate area on the floor and immediately fix it down taking care to position it correctly. Continue to install the soundproofing mats across the entire floor surface wall to wall ensuring the edges are tightly butted together. If gaps occur they should be kept as small as possible.
If a permanent fixing of this layer of soundproofing mat is not desired onto a timber suspended floor, then it can be nailed down with felt nails or simply loose laid.
Step 5.
Unroll the R10 wall to wall across the entire floor surface. There is a 50mm overlap of membrane on each roll and this should be used to overlap the edges of the previous roll laid. This insulation is not lapped up the walls but simply lie flat on the floor and trimmed where it meets the walls.
Step 6.
Now install the 19mm t&g QuietBoard floor panels. These are quite heavy so take care when handling them. To start with place a board in one corner with the grooved edges towards the walls but ensure there is an expansion gap of approximately 5mm between the board and the walls. Using a good quality wood adhesive, glue the joints of the boards as they are laid and continue along the side of the wall and be sure to maintain the expansion gap required. A diamond or tungsten tipped saw will be required for cutting the boards and when you have to cut a board in when you get to the end of the wall, use the offcut (if possible) to start the next run from where the first board was installed. If you have any damaged tongues, these can often be saved for the cutting in of the final row of boards when the damaged edges can be cut off with the offcut.
Step 7.
Use the Acoustic Sealant to fill the gaps between the QuietBoard flooring and walls and tool off flush with the floor. Refix the skirting boards if applicable but these must be installed with a small gap between them and the QuietBoard flooring. Just 1-2mm will suffice and can be achieved with thin cardboard packing pieces. When the skirting is fixed, remove the packing pieces but do not fill the gap! This will be hidden when the new floor covering has been installed.
Step 8.
Carpet can now be installed as normal using underlay and carpet grippers if required. Laminate flooring should be installed according to manufacturers instructions but on top of our Acoustic Laminate Underlay. Engineered flooring should be spot bonded and secret nailed or alternatively, installed onto our Acoustic Laminate Underlay and secret nailed.
NOTES
Any DIY orientated person can easily conduct the installation of the sound insulation with a sharp craft knife and a mastic gun but it may be preferred to use a second fix carpenter to install the QuietBoard.
If you have any difficulty with the installation or require any additional advice, please contact our Technical department on 0845 363 7131
The contractor shall be responsible for the examination and acceptance of all conditions and project suitability prior to the installation.
