Thin Ceiling System Installation Guide
Download this as a PDF file HERE
BE SURE TO READ THESE INSTRUCTIONS THOROUGHLY BEFORE COMMENCING ANY WORK
PLEASE NOTE !! THIS PRODUCT IS VERY HEAVY AND REQURIES TWO PEOPLE TO CARRY IT.
NOTE. THESE INSTRUCTIONS MUST BE FOLLOWED OTHERWISE INCORRECT INSTALLATION COULD OCCUR WHICH MAY HAVE A DETRIMENTAL EFFECT ON THE PERFORMANCE!
Introduction
The Thin Ceiling soundproofing system is designed to reduce noise nuisance from above without too much disruption.

Step 1.
Remove all electrical fittings (see note at the end of these instructions).
Step 2.
Find the position of the supporting joists with the aid of a thin bladed electrical screwdriver. With the screwdriver, poke it through the ceiling near the edge close to the wall and continue until you find a joist. This is when the screwdriver comes up against an obstruction and will not push through. Mark the spot with pencil on the wall then move along the wall about 400mm and use the screwdriver again to find the next joist. When the next joist has been located, mark it on the wall again and measure the distance from the first mark. Joists are usually installed at regular intervals so using the measurement just taken, it should be fairly easy to locate the rest of them after the first two have been found.
Step 3.
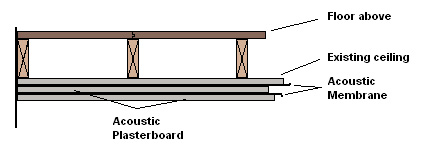
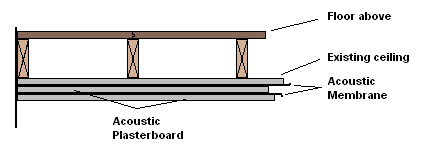
Cut the SoundBlocker Membrane into manageable sizes not exceeding two square metres and glue them to the ceiling. Using our special aerosol contact adhesive for this spray an appropriate area on the ceiling then spray the membrane and fix it directly to the previously glued spot taking care to position it carefully from the start. Exact jointing is not essential and any gaps should be avoided whenever possible and ensure the entire ceiling is covered with the membrane wall to wall.
The adhesive has an adjustable nozzle so it is usually better to select the widest spray pattern by turning the nozzle so it aligns with the symbol and usually marked H at one o’clock to the nozzle. The other settings are M and L for medium and low spray pattern. (See application instructions on side of can).
Step 4.
Screw a layer of 15mm high density Acoustic Plasterboard (Supplied) on top sandwiching the membrane. Ensure the screws are correctly placed by using the marks on the walls to fix the screws through into the supporting joists.
Step 5.
Repeat step 3.

Step 6.
Screw another layer of 15mm high density Acoustic Plasterboard on top sandwiching the membrane.
Ensure the screws are correctly placed by using the marks on the walls to fix the screws through into the supporting joists but take care to miss the original screws fixing the first layer. If this last layer of plasterboard is taper edged then the joints can be filled and finished before decorating otherwise the boards will have to be plaster skimmed first.
Step 7.
Holes for any electrical wiring should be sealed with our Acoustic Sealant before refitting any electrical fittings.
NOTES
It is strongly advised that a qualified electrician is used to remove and reinstate all electrical fittings and ensures that any wiring is long enough to allow for the additional thickness of your new sound insulated ceiling.
Plated screws should be used to reduce the risk of them corroding and they should be fitted so that the heads are just below the surface of the plasterboard.
If it is a concrete ceiling then ignore all references to insulation being applied to a timber suspended ceiling unless the ceiling is fixed to additional timber supports.
If you have any difficulty with the installation or require any additional advice, please contact our Technical department on 0845 363 7131
The contractor shall be responsible for the examination and acceptance of all conditions and project suitability prior to the installation.
